Serving an application over HTTPS
This page puts an application’s service on a public HTTPS address, such as
https://hello.example.com. piqueld runs a gateway in front of your
applications: it receives requests on ports 80 and 443, gets a certificate for
each hostname, and forwards each request to its service.
A route can also be private, so that only devices on your tailnet reach it; see private routes.
Before you start
- A domain name, and access to its DNS records.
- A server that the internet reaches on ports 80 and 443, with nothing else listening on them. Without inbound ports, such as behind NAT, serve your routes through a Cloudflare Tunnel instead.
- Docker Engine 28 or later on the server.
- An application whose service serves plain HTTP, such as
hellofrom Deploying your first application. - Run
piquelctlon the host, or on any machine where it is signed in. - Adding a route needs the
apps:writepermission on the application, and deploying itapps:deploy. The dashboard hides or disables the controls you can’t use.
piqueld doesn’t put a sign-in in front of your routes: anyone can open a public route, so your application handles its own authentication.
Enable the gateway
-
Enable it in your configuration, with
ingress.enabled:services.piqueld.settings.ingress.enabled = true;Or, in
/etc/piqueld/config.toml:[ingress] enabled = true -
Open TCP ports 80 and 443 in the server’s firewall. The NixOS module doesn’t open them:
networking.firewall.allowedTCPPorts = [ 80 443 ]; -
Rebuild the system, or restart the daemon with
sudo systemctl restart piqueld. piqueld reads its[ingress]settings only when it starts.
Check that the gateway runs. In the dashboard, System status on the Overview shows HTTPS ingress as Ready. On the host:
$ sudo piquelctl status
...
Public listener: healthy: Caddy is running and routing configuration is applied
Public ingress: ports 80/443
...
Add a route
-
Create a DNS record for the hostname: an A record to your server’s public IPv4 address. Add an AAAA record to its IPv6 address only if public IPv6 traffic actually reaches your server. piqueld can also create these records for you.
-
Add the route, in the dashboard, with
piquelctl, or in the manifest, as below. A route sends the hostname’s requests to a service, on the port it serves HTTP on inside its container; the port doesn’t need to be published. Make it public so that anyone on the internet can connect. Without that, the route is private.
Saving a route doesn’t change what’s served; deploying does. piqueld starts serving the route once its service is ready. The gateway then gets the hostname’s certificate from Let’s Encrypt, and renews it by itself. It redirects plain HTTP requests to HTTPS.
In the dashboard
- Open Applications, then hello, then its Routes tab.
- Select Add route.
- Fill in the Hostname, and set Visibility to Public.
- Set Destination to A service, then choose the Service and its HTTP port.
- Select Add route at the bottom of the dialog.
- Select Deploy to production.
Each route is a row, with the environments it is deployed in and whether HTTPS answers there. Edit changes it in the same dialog, and Remove takes it out of the saved configuration.
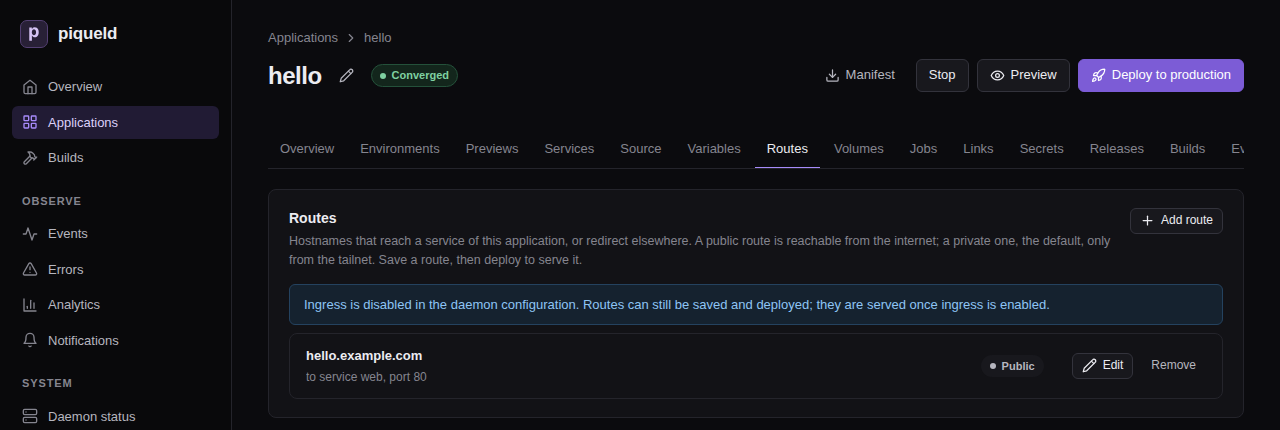
On a daemon whose gateway is off, as in this image, the tab says so above the routes. You can still save and deploy them. piqueld serves them once you enable the gateway.
With piquelctl
Add the route and deploy it with
app route add:
piquelctl app route add hello hello.example.com web 80 --visibility public --deploy
In the manifest
-
Add the route to the manifest,
hello.toml:[[spec.routes]] hostname = "hello.example.com" service = "web" port = 80 visibility = "public" -
Deploy it:
piquelctl app apply --file hello.toml --deploy
Check that it works
In the dashboard, the environment’s Overview lists the route’s URL in its
URLs card. With piquelctl, use
env url:
$ piquelctl env url hello production
URL: https://hello.example.com ready
The URL is ready once all of these hold:
- the gateway serves the route;
- piqueld itself fetched
https://hello.example.com, with a trusted certificate, and reached this server’s gateway; - its DNS records, if piqueld manages them, are in place;
- its service runs, with every replica healthy.
Until then, it is pending, followed by what it waits for.
To see every route of the application, with what each one’s hostname needs
from DNS, open its Routes tab: Deployed routes lists them. With
piquelctl:
$ piquelctl app route list hello
HOSTNAME  NAME  ENVIRONMENT  VISIBILITY  STATE  DESTINATION  DNS  RECORDS
hello.example.com  -  production  public  ready  web:80  manual  A/AAAA -> this server's public addresses
Each route is in one of these states:
| State | Meaning |
|---|---|
ready | piqueld reached the route over trusted HTTPS. |
pending | It waits for the gateway, DNS or its certificate. The next line says what to check. |
failed | It can’t be served, for example without a certificate; the next line says why. |
disabled | The gateway, or private routes, are turned off. |
Unlike the URL’s readiness, a route’s state doesn’t include its service’s health.
Redirect a hostname
A route can answer with a redirect instead, for example from www to your
main hostname.
In the dashboard, add the route on the Routes tab, set its Visibility to Public and its Destination to Redirect, fill in Redirect to, then select Save changes and Deploy to production.
With piquelctl, use
app route redirect:
piquelctl app route redirect hello www.hello.example.com https://hello.example.com --visibility public --deploy
In the manifest, then apply it with --deploy:
[[spec.routes]]
hostname = "www.hello.example.com"
redirect = { to = "https://hello.example.com" }
visibility = "public"
The gateway answers redirects itself, so they need no service. It sends a 308
redirect and keeps the request’s path and query: www.hello.example.com/about
goes to hello.example.com/about. To change that, set Status and Keep
path and query in the dashboard, --status and --no-preserve-path with
piquelctl, or
status and
preserve_path
in the manifest. Redirect hostnames get certificates like any other.
Give each environment its own hostname
A hostname belongs to one environment. Several hostnames can lead to one
service, but two environments can’t share a hostname: saving or deploying a
manifest that renders the same hostname in two environments fails with
hostname_conflict.
Give each environment its own hostname with a
variable: set the route’s hostname to
${{ vars.domain }}, and give domain a value in each environment. For a
staging environment beside production, the dashboard and piquelctl
remove the route to hello.example.com first: staging would render it too,
so piqueld refuses to create staging beside it. The manifest changes
everything in one save.
-
In the dashboard, open the application:
- On the Routes tab, select Remove on the
hello.example.comroute, then Save changes. - On the Environments tab, select New environment, name it
staging, then select Create environment. This opensstaging’s page: return to the application through the hello breadcrumb. - On the Variables tab, select Add variable, and name it
domain. Set its Default tohello.example.com, and its value in the staging column tostaging.hello.example.com, then select Save changes. - On the Routes tab, select Add route. Set its Hostname to
${{ vars.domain }}, its Service to web, its HTTP port to80and its Visibility to Public, then select Add route. - Select Deploy, then deploy each environment.
- On the Routes tab, select Remove on the
-
With
piquelctl, create the environment withenv createand set the variable withapp variable set. Single quotes keep your shell from expanding$. The last command deploys both environments:piquelctl app route remove hello hello.example.com piquelctl env create hello staging piquelctl app variable set hello domain hello.example.com piquelctl app variable set hello domain staging.hello.example.com --env staging piquelctl app route add hello '${{ vars.domain }}' web 80 --visibility public --deploy -
In the manifest:
[spec.variables]
domain = "hello.example.com"

[spec.environments.production]

[spec.environments.staging.variables]
domain = "staging.hello.example.com"

[[spec.routes]]
hostname = "${{ vars.domain }}"
service = "web"
port = 80
visibility = "public"
An environment keeps its hostnames until a deployment withdraws its routes, so no other environment or application can take them in the meantime.
To keep an environment, such as staging, off the internet, make its routes
private.
Read the client’s address
Your service receives requests from the gateway, not from the client. The
gateway adds the client’s address in X-Forwarded-For, and sets
X-Forwarded-Proto and X-Forwarded-Host. It replaces any X-Forwarded-For
the client sent.
Trust those headers only when they come from the gateway. While the gateway is
enabled, each service a route leads to gets the variable
PIQUELD_INGRESS_PROXIES: the comma-separated address
ranges the gateway connects from, such as 10.0.3.0/24. In Express, for
example:
app.set("trust proxy", process.env.PIQUELD_INGRESS_PROXIES.split(","));
The environment’s other routed services connect from that range too, so trusting it also trusts them.
Turn the gateway off
If you serve the dashboard on your own domain,
follow Move the dashboard off the gateway
instead: the daemon doesn’t start with the gateway off while
ingress.private.dashboard_hostname is set.
-
Turn the gateway off in your configuration:
services.piqueld.settings.ingress.enabled = false;Or, in
/etc/piqueld/config.toml:[ingress] enabled = false -
Rebuild the system, or restart the daemon.
In the dashboard, System status shows HTTPS ingress as Disabled,
and sudo piquelctl status on the host no longer prints a Public listener
line. Ports 80 and 443 close, and every route reports disabled once piqueld has
confirmed the gateway stopped. Until then, routes report failed, because
routing may still be active.
piqueld keeps your routes and certificates, and still accepts and deploys manifests with routes. When you enable the gateway again, it serves the routes of your deployments, including those deployed while it was off.
While the gateway is off, piqueld deletes the DNS records it manages, and deletes DNS-01 certificates once they expire.
Stopping the daemon, on the other hand, leaves the gateway running, so your routes stay up. The gateway keeps renewing the certificates it got itself. DNS-01 certificates, for wildcards, private routes and the dashboard, wait for the daemon to renew them. The webhook and dashboard hostnames stop answering, since the daemon serves them.
Move the dashboard off the gateway
The gateway serves the dashboard’s hostname, so the dashboard needs another address before you turn the gateway off.
This breaks your passkeys. The dashboard only works at the address
auth.public_url
names, and a passkey only works at the address it was created on. The
passkeys you have stop working, and the steps below add a new one.
-
Sign
piquelctlin with your account, on the host or through piqueld’s own tailnet node, which keep working after the change. The host operator can’t create enrollment links. -
Choose the dashboard’s new address, and add its settings to your configuration. Your own reverse proxy can now use ports 80 and 443.
-
Remove
ingress.private.dashboard_hostname, and turn the gateway off:services.piqueld.settings.ingress.enabled = false;Or, in
/etc/piqueld/config.toml, removedashboard_hostnamefrom[ingress.private], and set:[ingress] enabled = falseIf you set
auth.public_urlto the dashboard’s hostname, set it to the new address. Left unset, it becomes piqueld’s tailnet node’s address iftailscale.enabledis set, andhttp://localhost:7845otherwise. -
Rebuild the system, or restart the daemon.
-
Create a link that adds a passkey to your account:
piquelctl account enroll alice -
Open the link at the new address, and save the new passkey.
If no CLI login works any more, recover administrator access. Then check that the gateway stopped, as above.
Limits
- The service must serve plain HTTP, over HTTP/1.1. WebSockets and streaming responses work.
- A route serves a whole hostname: there is no routing by path, and no TCP or UDP port.
- An application has up to 64 routes.
- The hostnames of piqueld’s website (
auth.public_url), dashboard and webhooks, and the names below them, can’t be routed. A route that already had one still deploys, but isn’t served. - Removing a service, with Remove service on its page or
app service remove, also removes its routes from the saved configuration.
Troubleshooting
- The route stays
pendingwithPublic HTTPS is not verified yet. Check that the hostname’s A and AAAA records point at your server and no other, and that ports 80 and 443 are open to the internet. piqueld checks the route from the server itself, so a router that can’t loop the server’s public address back to it keeps the routepending, even when it works from elsewhere. Waiting for the gateway configuration to be applied. Check HTTPS ingress in System status.Ingress unavailable: could not prepare the Caddy gateway (requires free ports 80/443 and Docker 28+)means another program uses port 80 or 443, or Docker is too old. To see which, select Run checks under Installation checks on the Daemon status page, or runpiquelctl doctor: the Ports 80/443 and Docker Engine checks say what’s wrong. Running them needs thesystem:readpermission. If you run your own reverse proxy for the dashboard, move it to other ports or another server.- A route stays
pendingafter its environment was stopped. A stopped environment’s routes aren’t served. It keeps its hostnames, certificates and DNS records, so starting it serves them again within ten seconds: select Start on the environment’s page, or runpiquelctl env start <app> <environment>. - Saving fails with
hostname_conflict. Another environment or application already has the hostname, or piqueld uses it itself. See the previous section. - A route deploys but isn’t served, and the daemon logs
route hostname is reserved for the piqueld website or its webhooks; the gateway will not publish it. The route had the hostname before piqueld used it itself. Give the route, or piqueld’s website, dashboard or webhooks, another hostname; see Limits. - Your service sees the same client address for every IPv6 request. Docker forwards IPv6 to an IPv4-only network through a proxy, which hides the client. Serve the route over IPv4 only, by removing its AAAA record.