Managing accounts
Invite people to piqueld, help them add passkeys, and remove their access when
they leave. You do this on the dashboard’s Accounts page or with
piquelctl account.
Before you start
- You have an account. Everyone can
change their own account. Changing someone else’s needs
accounts:manageand every grant their account holds; see who may manage accounts. - The
piquelctlcommands on this page run on your machine, signed in as your account, as when you signed it in.piquelctl accountlists their options.
The Accounts page
Open Accounts in the dashboard’s sidebar. It lists each account with its display name, its access in a few words, and how many passkeys it has. Select an account to open its page: the Profile tab holds its Profile and its Access, and the Access tab its Passkeys and its Sessions and API tokens.
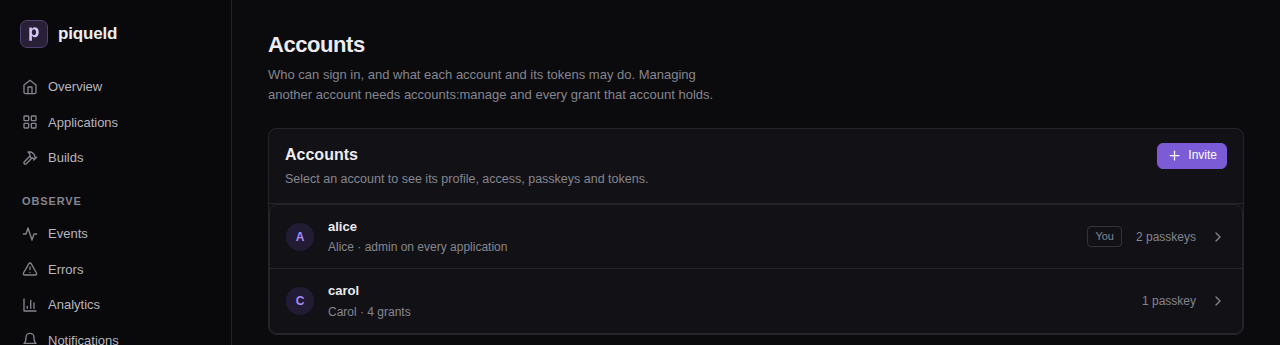
Without accounts:manage, the page only shows your own account. With it, the
page lists every account, the invitation and enrollment links waiting to be
used under Pending links, and the browsers signed in as the host operator
under Host operator sessions.
piquelctl account list prints the same accounts and their grants:
$ piquelctl account list
alice (01a16b4b-ef93-7971-b6f6-e8359d3c4d52)
  admin on every application
bob (01a16b4c-84dc-70d1-98eb-0ddfde57971b)
  apps:read on blog, shop
  apps:write on blog, shop
…
Invite someone
An invitation is a link that creates one account. You choose what the account may do: there’s no default access. The person who opens the link chooses its username and registers its passkey.
The link isn’t tied to a person or an email address: whoever completes it first gets the account and its access. Send it only to the person it’s for, over a private channel you trust. If anyone else may have seen it, revoke it.
- On the Accounts page, select Invite.
- To limit the access to some applications, clear Application permissions apply to every application, including future ones, and select them.
- Choose a Preset, or select permissions one by one. Permissions says what each one allows.
- Select Create link.
- At the top of the page, select Copy next to the new link, then Done.
- Send the link to the person it’s for.
With piquelctl:
piquelctl account invite --preset developer --app blog --app shop
It prints the link, such as
https://piqueld.<tailnet>.ts.net/dashboard/auth#invite=…. --preset and
--permission choose the access, and --app limits it to applications, by
name or ID. Give an account access
describes these options. You can only hand out access you hold yourself.
When the person opens the link, the Create your account page asks for a Username, an optional display name, and a Passkey name. They select Create account with a passkey, save the passkey, and the dashboard opens, signed in.
The link works once, within 24 hours. Opening it doesn’t use it up, so someone who closes the page before finishing can open the original link again. The dashboard removes the link from the browser’s address bar and history as soon as it reads it.
Revoke an invitation
Links waiting to be used are listed under Pending links, at the bottom of the Accounts page, with who issued them, what they grant, and when they expire. Enrollment links show Add a passkey to and the account’s name.

Select Revoke to cancel a link before it’s used. Deleting the account that issued a link also revokes it.
With piquelctl, list the links to find the one to revoke, then revoke it by
its ID:
$ piquelctl account invitation list
01a16b52-3f0e-7c41-9d2a-6b8e0f4c7d15 invitation by alice (expires at Unix 1793262000)
  apps:read on blog
  apps:deploy on blog
01a16b53-7a21-7e93-8c4f-2d9b1e6a0c38 enrollment for carol by alice (expires at Unix 1793262600)
$ piquelctl account invitation revoke 01a16b52-3f0e-7c41-9d2a-6b8e0f4c7d15
Add a passkey
Each passkey belongs to one account, and only that account adds one: from a browser where it’s signed in, or through an enrollment link.
To your own account
- Open your account from the Accounts page, then its Access tab.
- Under Passkeys, select Add passkey, and name it after the device it
lives on, such as
Phone. - Select Add passkey in the dialog, and save the passkey when your browser asks.

To add one on a device with no browser signed in, print an enrollment link for
your own account with piquelctl, signed in with your account’s full access:
piquelctl account enroll alice
Open the link on that device yourself, and don’t share it: it signs in whoever uses it.
A second passkey, on another device or in a password manager, means losing one device doesn’t lock you out. If you’ve already lost them all, see someone lost their passkey.
To someone else’s account
When someone has lost their passkeys, or wants to sign in on a device that can’t share them, send them an enrollment link.
Whoever uses the link registers a passkey on the account and signs in as it, with all its access. Before you create one, check that the request comes from the account’s owner, such as in person or over a channel you already know is theirs. Send the link over a private channel you trust. If anyone else may have seen it, revoke it.
- Open their account from the Accounts page, then its Access tab.
- Under Passkeys, select Create enrollment link.
- At the top of the page, select Copy next to the new link, then Done.
- Send them the link.
Or create it with piquelctl:
piquelctl account enroll bob
When they open the link, the Add a passkey page asks for a Passkey name. They select Register passkey, save the passkey, and the dashboard opens, signed in as their account.
The link works once, within 24 hours. Creating another link doesn’t cancel the first; revoke the ones you no longer need under Pending links.
Rename or remove a passkey
Under Passkeys, on the account’s Access tab, select Edit next to the passkey, change its Passkey name and select Save.
Removing a passkey can’t be undone, and the dashboard doesn’t ask to confirm. To remove one, select Remove next to it.
With piquelctl, list the passkeys to find their IDs, then rename or remove
one:
$ piquelctl account passkey list bob
01a16b4f-2c8d-7b16-a5e3-9f0d4c7b2e61 Laptop (bob)
$ piquelctl account passkey rename 01a16b4f-2c8d-7b16-a5e3-9f0d4c7b2e61 "Work laptop"
$ piquelctl account passkey remove 01a16b4f-2c8d-7b16-a5e3-9f0d4c7b2e61
account passkey remove asks you to confirm first.
Removing a passkey stops it from signing in, but it doesn’t end the sessions and tokens already open. If the passkey was lost or stolen, revoke the account’s sessions and tokens too.
Edit a profile
Under Profile, on the account’s page, change the Username or the Display name, then select Save profile.
- A username has 1 to 64 ASCII letters, digits, dots, dashes or underscores.
It is unique regardless of case:
Aliceandaliceare the same name. - A display name is optional, up to 200 bytes.
With piquelctl, give the new --username, --display-name, or both:
piquelctl account update bob --username robert --display-name "Robert"
If you saved a piquelctl login for the account, its name changes with it, so
--account robert selects it.
Renaming an account doesn’t change its ID, which the audit trail and saved CLI logins use. To change someone’s access instead, see give an account access.
Revoke sessions and tokens
Sessions and API tokens, on the account’s Access tab, lists everything
that acts as the account: browser sessions (Browser), piquelctl logins
(Cli), and API tokens
(Token). Each row shows what it may do, when it was last used, and when it
expires.

- Revoke ends one at once.
- Revoke all ends all of them, including the session you’re using if it’s your own account.
- Activity opens its requests in the audit trail.
With piquelctl, token list lists your own sessions and tokens, and
token revoke <id> revokes one; see
revoke a token. Add --user for someone
else’s account, and --all to revoke them all:
piquelctl token list --user bob
piquelctl token revoke --all --user bob
Without --user, token revoke --all signs your own account out everywhere,
including the piquelctl login running it. An API token or
limited login can’t do this for its
own account.
Delete an account
Deleting an account also deletes its passkeys, sessions and tokens, and the links it issued. It can’t be undone. Its requests stay in the audit trail.
- Open the account from the Accounts page and select Delete account, at the top of its page.
- Confirm in the dialog that asks whether to delete the account and all its passkeys, sessions, and tokens.
You can delete your own account. With piquelctl, which asks you to confirm
first:
piquelctl account delete bob
Troubleshooting
- The change is refused with
account_lockout. At least one account must keepadminon every application and a passkey, so that someone can always sign in and manage piqueld. piqueld refuses to remove the last such account’s access, its last passkey, or the account itself. Make another account that has a passkey an administrator first. - The change is refused with
permission_exceeded. The account holds access you don’t, or you’re handing out access you don’t hold. Ask someone who holds it. - A link answers “API returned 400 Bad Request: authentication_invalid (this link is invalid, expired, or already used)”. It was already used, has expired, or was revoked. Ask for a new link.
- The same refusal comes after the browser saved the passkey. The link
expired, was revoked or was used in the meantime, or its issuer can’t
create it any more: they lost
accounts:manageor the access it grants, or, for an enrollment link, the right to change that account. Delete the saved passkey from the device, and ask for a new link. A link refused because of its issuer stays under Pending links until it expires. - Registration fails with
account_conflict. Another account has that username, regardless of case. Register again with another name. If someone took the name while you were creating the passkey, the browser has saved it already: delete it from the device first. - Creating a link answers “the host operator is not an account”. Sign in with an account to create invitations and enrollment links.